System Tray Clock: The system tray clock, which can be found on the right side of the Windows taskbar, is somewhat dull. Wouldn’t it be fantastic if you could customize the system tray clock with a selection of different skins? Unfortunately, Windows doesn’t allow you to do this by default, so you’ll have to make do with the dull, primary clock.
With a free Desktop Clock program, you can change the skin of the system tray clock. It’s a freeware software with nine different system tray clock skins. You may also customize the appearance of the system clock on Windows 10, 8, 7, and XP with the program.
Table of Contents
Installing a Free Desktop Clock
Open the Free Desktop Clock website in your preferred browser to download the clock. Then, to save the program’s setup wizard, click the blue Download button.
Double-click the freeclock.exe file to launch the setup wizard and install the software once downloaded.
What to Look for When Choosing a New System Tray Clock Skin
Open the Free Desktop Clock window once everything is in place. On the left side of the window, select Skins. If it isn’t already enabled, check Enable tray clock. Then, as seen in the screenshot below, please select one of the skins on that tab and click OK to add it to the system tray clock.
You may give the system tray clock more information with the different settings. To include date and day details alongside the clock, choose Show date and Show day of the week. When you select Show percent of memory in use, your PC’s RAM utilization percentage is displayed.
Click the Default background drop-down option to alter the clock’s background color. Select the Color backdrop selection from the drop-down menu. Then, click on the palette box to select a different hue. You may also give the clock some transparency by changing the value of the Transparent setting.
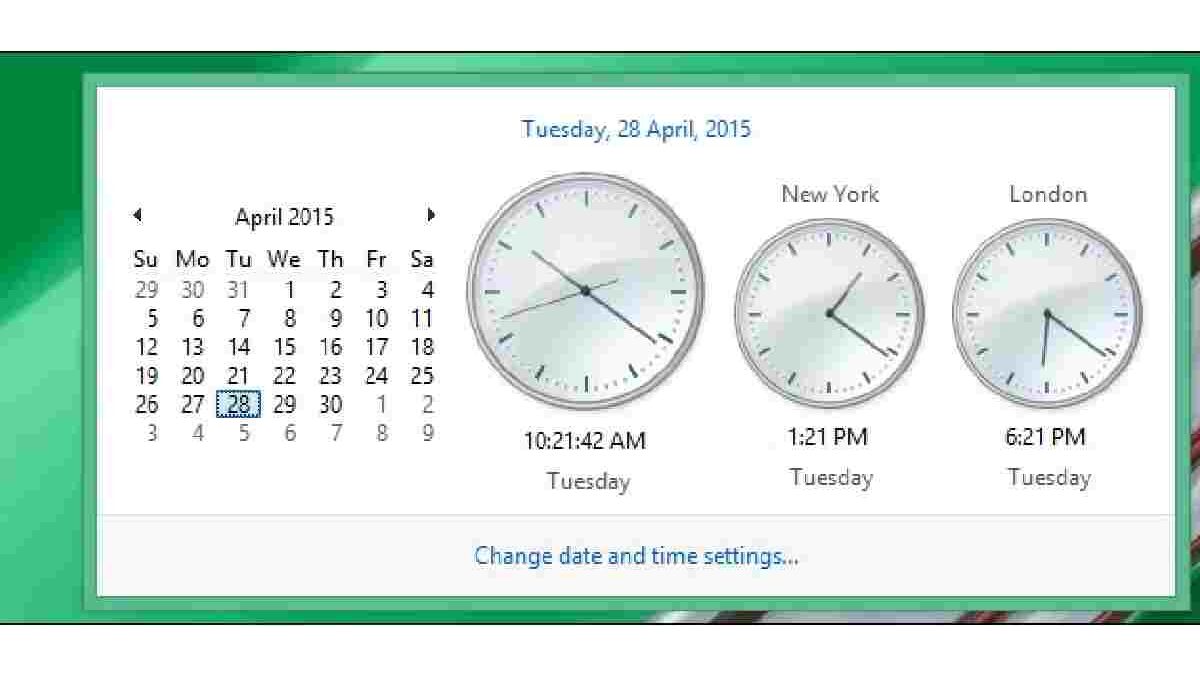
How to Add Clocks from Different Time Zones
Free Desktop Clock has choices for displaying clocks for many time zones. If you ever need to check the time in another country before making an international phone call, such watches can come in helpful. To see those options, go to the Time Zones tab.
In the Timezone drop-down menu, select a zone. Select the Show this clock checkbox to activate a time zone clock. You may also type a clock title in the Enter display name box.
How to Make a Time Announcement Every Hour
The hourly time announcement feature of Free Desktop Clock is also available. Once activated, this option will chime every hour on the hour. It’s a convenient method to keep track of time without looking at the clock.
That option is found in the Customizations menu. Check the Hourly time announcement checkbox on that tab to enable the chance. Then, next to the Soundbox, use the button to select an audio file for the announcement.
Atomic Alarm Clock’s Extra Features
You’ll undoubtedly notice the alarm tabs on the Free Desktop Clock window. These additional features can only be found in the more powerful Atomic Alarm Clock software, which costs $14.95. You may set alarms for certain times using that software, and there are additional system tray clock skins to select from. In the premium edition, you can also sync the clock with an online time server.
With A Free Desktop Clock, You Can Spruce Up Your System Tray Clock.
You don’t have to use the dreaded old system tray clock in Windows 10/8/7/XP anymore, as you’ve seen. Instead, you can use Free Desktop Clock to quickly and easily change the skin (or Atomic Alarm Clock). Once you’ve mastered the software, you’ll be able to add far more visually appealing clocks to the Windows system tray, as well as further personalize them with other parameters.